
The process of making a graphic novel is similar to driving across the country. It takes a lot of careful planning, obstacles come up that you don’t expect, the way is long and circuitous, and although you think you have some control over your direction, in reality there are so many variables that can cause the tire of your script to blow out, the engine of your layouts to overheat, or any number of technical faults that can send your entire story structure careering off-road.
I’ve written about the writing, drafting, and script shaping process here, here, here and here, and in December 2015 I finally got started in earnest on drawing out the first pages. This post will give a small insight into the process, from script to page, of a chosen few of these pages, with some annotation on process and revelations.
Here’s a little timeline of how it’s all gone down:
May 2014: Begin compiling dot points of diary entries
September 2014: 20,000 words of script and I start thinking about how to structure it all. I know that’s the opposite way of doing things, but I’m a maverick, and working from a predefined list of events (diary entries) brings about it the need to work in a custom manner.
March 2015: A few script drafts and rounds of feedback later, with the help of handy software Scrivener and some patient colleagues including The Unreliable Narrator.
July 2015: Start roughing out pages digitally using Manga Studio Ex 5. This began with copying and pasting the script directly from Scrivener into Manga studio. Shot, action and dialogue were all laid out quickly and easily, and I was able to quickly get an overview of the flow of story. After messing around with variations on InDesign and Photoshop processes, I had to make a diary comic to relate the feeling I had once I finally figured out a quick and easy workflow.

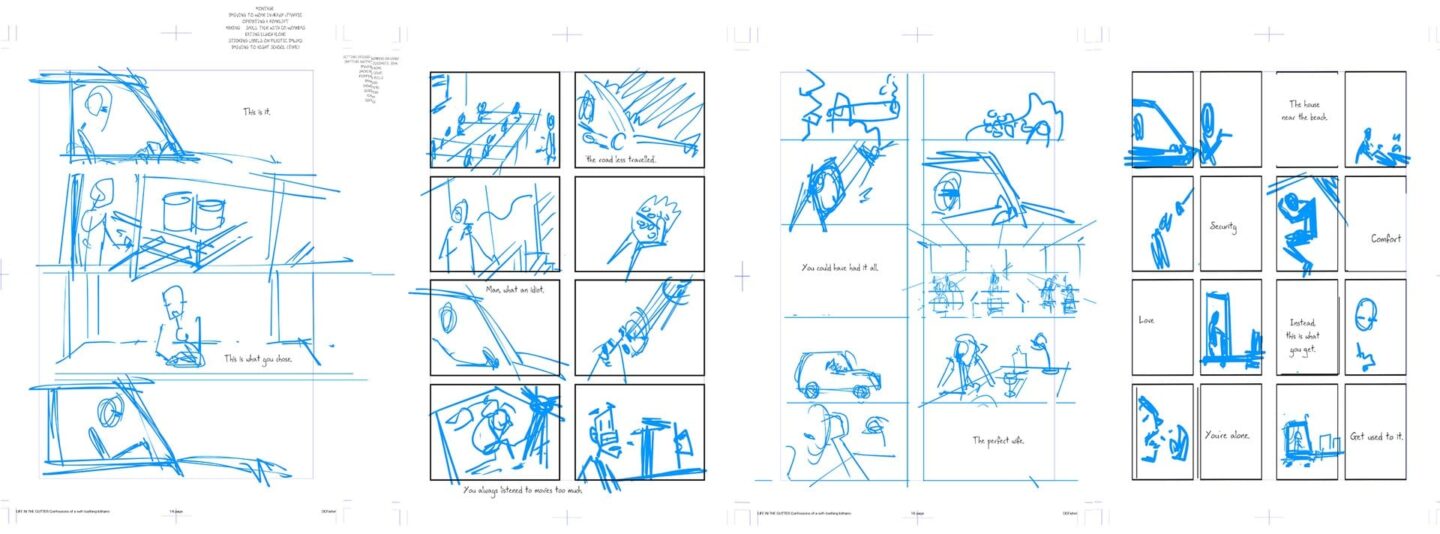
I was pretty happy, and at this point began reformatting the script in Scrivener to a proper screenplay format, revising dialogue, trimming the fat, and laying it all out. Page to page, imagining images in my head, getting a feel for the tempo of the story, while being able to lay out the pages almost as quickly as the reader would be able to consume them. Working digitally from script and directly to the page means that I can lay down the flow of the story very quickly, without the pages being weighed down by text or too many panels, as can happen when you spend as long as you need to drawing out each page. The pages I have shown here represent a montage of sorts, aimed at conveying how the minute of the daily grind, after a while, can rob the days of their meaning, while repeating events recede in significance, until life is a broken sequence of meaninglessness.
Cheerful stuff.

The next stage was to layout the images. I decided to adopt a workflow of digital layouts, to be then printed and pencilled/inked traditionally. I mainly stole this process from artist Frank Quitely (who I visited in his Glasgow studio and wrote about here and put up a pages review here). If it’s good enough for one of the premier visual artists working not only in comics but the broader arts community, then it’s good enough for me. Frank, however, pencils directly over the top of his blue lines, which he prints onto bristol board, whereas I’ve gone a slightly different route.

As you can see, all figures are blocked in quite loosely, with the main concern at this point timing, pacing, and general layout. The second stage SHOULD have been a finessing of these pages with another round of digital touch-ups and corrections, however as observed earlier, I’m a maverick. I wanted to get haptic asap, and see if my chosen method of working would yield effective results.
My parchment of choice here is bleed proof paper, which is handy for two reasons. One, it works beautifully with Copic markers, which is my chosen visual approach for this, and two, the thin nature of the paper means I can see through it quite well without needing a light box for this stage of production. I used a technique developed with the diary comics of first using a cool gray 4 Copic marker to flesh out forms quickly and gesturally using (mainly) the chisel side of the marker. This done, I went in with technical pens and picked out lines, using a variety of sizes from 0.1 to 1.0. This process was very quick and I could easily produce three or four pages per day.

With this complete I still had quite a bit to do, as the panels need to be delineated and lettering remaining. I’ve decided to do all of this digitally, so the pages were scanned and dropped into an InDesign document. Using InDesign for lettering and panel borders means I can use vectors; this, coupled with high-resolution scans, gives me a fair amount of freedom image reproduction. The digital stage took almost as long as the traditional stage, with panels needing to be resized, messing about with stroke, font, and word balloons. But the end result, I think, is worth it.
 Working this way gives me a great deal of freedom, not only in being able to move quickly through the image making, but also in changes to lettering and layout. The next round of pages will incorporate a secondary digital cleanup stage, as the rough, super loose nature of the digital layouts meant I had to redo quite a few panels, which ended up costing me more time than I saved in the initial stages. Preparation in setup, particularly in making full use of the capabilities of working digitally, including taking the time to set up perspective grids, using reference, and working from model sheets, while taking a little longer, saves a lot of time and frustration at the end. Measure twice, cut once kind of stuff.